Basic Terminology
- Acoustic window–organ or tissue that facilitates viewing of structures beyond it. Acoustic windows are necessary when imaging certain organs that are less amenable to ultrasound scanning, e.g., heart.
- Echogenic–describes structures that appear as echoes on an ultrasound monitor. Differences in the level of echogenicity are described by the following:
- hypoechoic—less echoes (darker in appearance)
- hyperechoic—more echoes (brighter in appearance) e.g., gallstones
- anechoic–no echoes (completely black in appearance) e.g., bladder
- Power—modifies amount of energy leaving the transducer
- Gain—modulates the amount of received echo signal (analogous to a volume control)
- Time Gain Compensation (TGC)—controls echo amplification at various depths and usually present as a slide control. TGC allows increasing the gain at different depths without changing the overall gain
- Near field and Far field—refers to imaged areas that are nearer and farther from the probe surface
Primary Applications
Abdominal Trauma
Background
- Ultrasound has been used to evaluate emergency patients since the 1970s, but only in the last 10 yr has there been significant interest in the United States. Many prospective studies done by emergency physicians and surgeons here in the United States confirm that this modality can be used by nonradiologists with the reported sensitivity for free intraperitoneal fluid varying from 80-90% and the specificity 95-100%.
- The noninvasive and time-sensitive nature of bedside ultrasound emergency medicine has now led to the replacement of diagnostic peritoneal lavage at most major US trauma centers.
Indications
- Bedside ultrasound is very useful for the rapid detection of:
- hemoperitoneum,
- pericardial effusions, and
- pleural effusions.
- Ultrasounds greatest utility is in the evaluation of blunt abdominal trauma for hemoperitoneum and in penetrating chest injuries for the detection of pericardial effusions.
- Below are suggested algorithms for incorporating bedside ultrasound in trauma
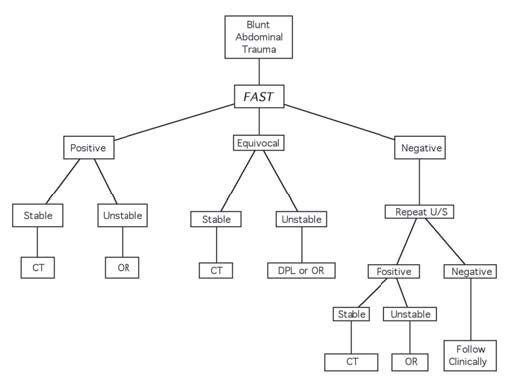
Figure: Blunt abdominal trauma algorithm.
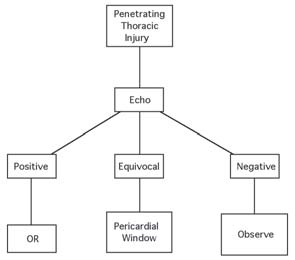
Figure: Penetrating chest injury algorithm.
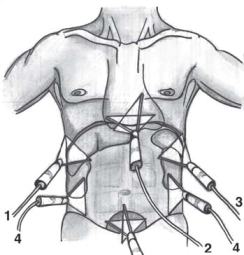
Figure: Transducer positions for the FAST exam.
The Focused Examination
- Focused abdominal sonography for trauma (FAST) consists of focused views of the abdomen including the pericardium and is performed after the primary survey. Multiple views greatly increase the sensitivity of ultrasonography and standard areas examined include the following:
- Morison’s pouch
- Pericardium
- Perispenic space
- Paracolics
- Suprapubic view
Morison’s Pouch
Pericardium
- The pericardium is especially important to evaluate in penetrating thoracic injuries to rule out a pericardial effusion and tamponade.
- For this view, the probe is placed in the subcostal area just to the right of the xiphisternum and the probe angled toward the patient’s left shoulder. To view the heart adequately, you will need to increase the depth of penetration at this point. A coronal section of the heart should give you a good four chamber view of the heart.
- The normal pericardium is seen as a hyperechoic (white) line intimately surrounding the heart.
- A pericardial effusion is seen as an anechoic (or black area) surrounding the heart within the pericardium.
Perisplenic Area
Paracolic Views
- The paracolic views can be done in conjunction with Morison’s pouch and the perisplenic view. Simply place the probe in the paracolic area and examine for free fluid and/or free floating loops of bowel. Fluid is often detected first on other views limiting the usefulness of the paracolic view, and thus this view is eliminated in some protocols.
Suprapubic View
- Ideally this exam is done prior to the placement of a Foley catheter. The full bladder is easily found by placing the probe just cephalad to the pubis. Once the bladder is found, look for free fluid anterior, posterior and lateral to the bladder. In females, the uterus will be seen posterior to the bladder. The cul-de-sac is a very dependent area of the peritoneal cavity and should be carefully examined for free fluid.
Pitfalls
Echocardiography
Background
- Echocardiography provides a bedside noninvasive manner to examine the anatomy and physiology of the heart. Cardiac anatomy including chambers, valves and pericardium and surrounding structures are well visualized using today’s equipment. Furthermore valvular pathology, pericardial effusions and tamponade, wall motion abnormalities and hemodynamic information can also be provided using this technique.
- Echocardiography for the emergency physician focuses on the presence of:
- Pericardial effusions and tamponade
- Gross cardiac activity in pulseless electrical activity (PEA). The absence of cardiac
activity in PEA implies true electromechanical dissociation and thus an extremely
poor prognosis.
- Used in this focused manner, bedside echocardiography meets the criteria for emergency physician ultrasound use.
- The condition in question is life-threatening.
- Ultrasound is the primary diagnostic modality.
- Ultrasound decreases the time or cost of the evaluation.
- Ultrasound serves as an adjunct for a procedure.
Indications
- Suspicion of a pericardial effusion with or without tamponade
- Evaluation of cardiac activity in PEA
The Focused Exam
- To learn this technique you must first understand the concept of cardiac windows and
planes. The heart, being surrounded by air-filled lungs, poses a natural challenge for
ultrasound technology. Special acoustic windows give us a view into the chest to examine the heart by ultrasound.
- The main acoustic windows include the following:
- Subxiphoid window
- Parasternal window
- Apical window
- Through these three windows the heart is examined through three different planes. Since
the heart is not aligned along standard anatomical planes, the following convention is used:
- Four chamber plane (coronal)
- Long axis plane (sagittal)
- Short axis plane (transverse)
- A combination of the above 3 windows and 3 planes is used in emergency
echocardiographic exams using a 2.5-3.5 MHz phased array or microconvex probe. At
times patient body habitus and cooperation will allow only one of the below views to
be completed, and thus knowledge of multiple views is necessary.
- Subcostal window—place the probe just right of the subxiphoid area and scan in a
coronal plane with the tip of the probe pointing toward the left shoulder. You will
need to maximize the depth for this view, and you will examine the heart in a four
chamber plane.
- Parasternal window—place the probe at the 2nd-4th intercostal space just left lateral of the sternum. The marker will be toward the patient’s right shoulder and thus
the beam which you scan the heart is in a long axis plane. In this view you will see
the right and left ventricles, left atrium, aortic outflow tract and the pericardium.
- This is the single best view to examine for pericardial effusions.
The short axis view is obtained by rotating the probe 90 degrees such that the
marker is now toward the left shoulder. On this view you will see the right and left
ventricles and pericardium.
- Apical window—have the patient turn to their left side and place the probe at the
point of maximal impulse (PMI). Keep the marker toward the patients left and you
will obtain a four chamber plane of the heart.
- Pericardial effusions—effusions will be identified as anechoic areas surrounding the heart
within the pericardium. Pericardial fat can have the same echogenicity of
fluid. On the parasternal long axis view, anechoic areas seen only anteriorly usually
represent pericardial fat as fluid should be seen posteriorly as well because of gravity.
Pericardial effusions are graded as follows:
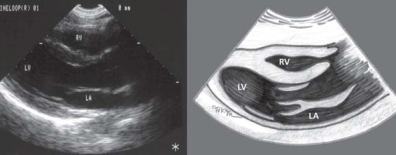
Figure: Normal long axis parasternal view of the heart.
- Small—seen posteriorly only
- Moderate—circumferential but < 1 cm in width
- Large—circumferential and >1 cm in width
Pericardial effusions that have diastolic collapse of the right ventricle represent patients with tamponade physiology.
Pitfalls
- Obese patients and those with COPD are more difficult to ultrasound.
- Epicardial fat and pleural effusions can be confused with pericardial fluid.
- Loculated effusions will be more difficult to detect.
Biliary Tract Disease
Background
Emergency Indications
- Ultrasound provides valuable information on emergency patients with following suspected conditions:
- acute biliary colic
- acute cholecystitis
- acute pancreatitis
The Focused Exam
- The focused exam is to detect the presence or absence of cholelithiasis
- Other important sonographic signs of cholecystitis include:
- Thickened gallbladder wall—>5 mm
- Decreased echogenicity of gallbladder wall
- Increased transverse diameter of the gallbladder—>4-5 cm
- Ultrasonographic Murphy’s sign
- Pericholecystic fluid
- Dilated common bile duct—normal = 1 mm/decade of life
- Place the patient in a slight left lateral decubitus or in a supine position. The upright or sitting position may be necessary in some patients. Body habitus, presence of abdominal gas and patient cooperation will may play a significant role in good image acquisition.
- Use a 3.5 MHz probe with a microconvex head which allows intercostal scanning and obtain the following:
- Long axis view of the gallbladder—Place the axis of your probe perpendicular to the costal margin and scan either intercostal or subcostal. On this view the portal vein should easily be seen inferior to the gallbladder.
- Short axis view of the gallbladder—After obtaining and reviewing the long axis view, rotate your probe so that the marker is toward the patient’s right and scan the gallbladder in a transverse fashion from superior to inferior.
- Carefully scan the entire gallbladder for the presence of cholelithiasis. Gallstones lie within the gallbladder, are echogenic, cast shadows and are often mobile. Bowel shadows will lie outside the gallbladder but can mimic gallstones to the novice.
Pitfalls
Renal Ultrasound
Background
- Renal ultrasound is a useful adjunct when evaluating patients for acute obstructive uropathy. Typically acute urinary tract obstruction causes hydronephrosis of the calyceal system, and this dilatation is easily detected by renal ultrasound.
- Though computed tomography is increasingly being used to evaluate obstructive uropathy, ultrasound has the advantage of using no radiation or contrasts agents. Furthermore it is fast, inexpensive and can be done at the bedside.
Indications
- Acute flank pain with suspicion of renal colic
The Focused Exam
- The focused exam is the detection of acute hydronephrosis.
- Occasionally renal, ureteral or bladder calculi may be seen as echogenic structures with shadowing (similar to gallstones).
- Place the patient in the left or right decubitus position for evaluating the right and left kidneys respectively. The large acoustic window of the liver makes the right kidney easier to visualize than the left, and thus this kidney is often well examined in the supine position. More probe manipulation may be required to obtain good left kidney images.
- Use a 3.5 Mhz microconvex probe though a 5 MHz probe may be used in thin patients.
- Initially place the probe at the base of the costal margin laterally until the kidney can be seen in coronal view. Obtain a good long axis view of the kidney, and then rock the transducer gently side to side to examine the entire central calyceal system.
- Rotate the probe such that a good transverse view can be seen. Scan the kidney superior to inferior and look for hydronephrosis which will be evident by an anechoic area within the pelvis of the kidney.
- Always scan both kidneys and grade the presence of hydronephrosis as none, mild, moderate or severe.
Pitfalls
Ectopic Pregnancy
Background
- Ectopic pregnancy is the leading cause of maternal death in the first trimester and is increasing in incidence. Thus all females of child-bearing age should be assumed to be pregnant and one of the essential components of the emergency evaluation is to ensure an intrauterine pregnancy.
- Ultrasound is a safe, integral and essential component of the evaluation of these patients. This bedside technique can quickly and reliably detect an intrauterine pregnancy and hemoperitoneum from a ruptured ectopic pregnancy.
Indications
- First trimester abdominal pain or bleeding in which an intrauterine pregnancy has yet
not been established.
The Focused Exam
- In the clinical approach to first trimester abdominal pain or vaginal bleeding our main focus is the detection of an intrauterine pregnancy. In the algorithm to this condition, identification of an early intrauterine pregnancy essentially rules out an ectopic pregnancy. The risk of a heterotopic pregnancy is low at approximately 1:25,000 but increases with the use of fertility medications to as high as 1:5000.
- Patients that have an intrauterine pregnancy (IUP) identified may be treated clinically as the situation dictates.
- For those with no IUP identified, a quantitative B-HCG can help further stratify these patients.
- Those with quantitative measurements < 2000 and who are clinically asymptomatic, may be discharged to 48 h follow-up with repeat sonography and quantitative B-HCG.
- They need appropriate aftercare instructions to return if pain or bleeding recur. Patients that are symptomatic or those with B-HCG levels of >2000 are at higher risk and need emergency gynecology consultation.
- The two approaches to pelvic sonography are transabdominal and transvaginal. Outlined below are key differences in these techniques.
|
Transabdominal |
Transvaginal |
| Probe type |
3.5-5.0 MHz |
5.0-7.5 MHz |
| Sonographic planes |
Longitudinal and transverse |
Sagittal and coronal |
| Bladder preparation |
Full bladder |
Empty bladder |
| Field of view |
Wide |
Narrow |
| Resolution |
Less resolution |
Better resolution |
| Gestation |
Later gestation |
Early gestation |
- Transvaginal sonography detects early embryonic structures indicative of pregnancy approximately 1 wk before that seen on transabdominal sonography. Thus transvaginal sonography is a superior technique and should be used whenever possible. Transabdominal sonography used alone is only appropriate if the technique clearly identifies an IUP.
- Early embryonic structures sonographically appear in a sequential pattern as outlined
below. The first definitive sign of an IUP is the presence of a yolk sac within the gestational
sac.
| Embryonic Structure |
Transabdominal (weeks) |
Transvaginal (weeks) |
| Gestational sac |
5.5-6 |
4.5-5 |
| Yolk sac |
6-6.5 |
5-5.5 |
| Fetal pole |
7 |
5.5-6 |
| Cardiac activity |
7 |
6 |
| Fetal parts |
>8 |
8 |
- Transabdominal technique—Using a 3.5-5.0 MHz probe, identify the uterus posterior to the bladder and scan in a sagittal and transverse view. Carefully examine the entire uterus looking for a gestational sac and evidence of an IUP including yolk sac and fetal pole. Examine the cul-de-sac and morison’s pouch for evidence of free intraperitoneal fluid.
- Transvaginal technique—Place ultrasound gel on the probe tip followed by a protective condom over the entire transvaginal probe. Gently insert the probe into the vagina. Scan the uterus in a sagittal and coronal fashion examining for evidence of an IUP. Also examine the adnexa for unusual masses and the cul-de-sac for free intraperitoneal fluid. After the exam, carefully clean and disinfect the vaginal probe.
Pitfalls
- Failure to perform both transvaginal and transabdominal sonography when evaluating for ectopic pregnancy.
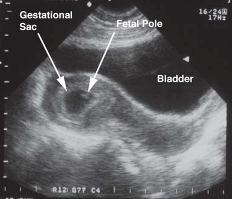
Figure: Transabdominal view of the uterus in long axis showing a gestational sac and fetal pole.
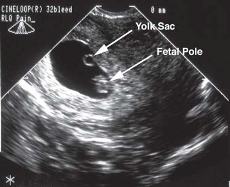
Figure: Transvaginal view of the uterus in long axis showing a yolk sac and gestational sac within the uterus.
This in conjunction with a positive pregnancy test and free intraperitoneal fluid is indicative of an ectopic pregnancy.
- Falsely interpreting a gestional sac as a definite indicator of an IUP.
- Failure to recognize the position of the gestational sac and pole.
- Failure to look for free intraperitoneal fluid in the upper quadrants.
- Over-reliance on B-HCG measurements in symptomatic patients.
Abdominal Aortic Aneurysms
Background
- There are few medical emergencies that have consequences equal to that of a ruptured aortic aneurysm. Early detection and operative therapy are paramount in survival of this acute life threatening condition.
- Though computed tomography is an excellent imaging modality in stable patients, it has no role in acutely symptomatic patients. Unstable patients are best evaluated at the bedside with EP performed ultrasonography. Ultrasound provides an excellent screen of aortic diameter and can help direct management at the bedside.
Indications
- Abdominal pain suspicious for abdominal aortic aneurysm
The Focused Exam
Pitfall
- Bowel gas may impair your ability to fully examine the aorta. If the entire aorta cannot
be visualized, then an alternate imaging modality such as computed tomography will
be necessary.
- Retroperitoneal nodes or masses may displace the aorta making it more difficult to
examine.
- Patients with previous aortic repair will be more technically difficult and thus formal
imaging will be required.
|